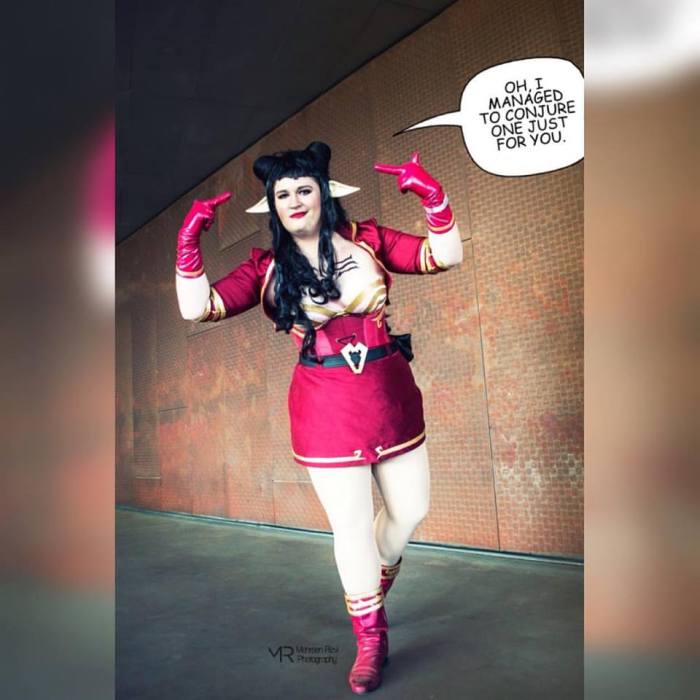
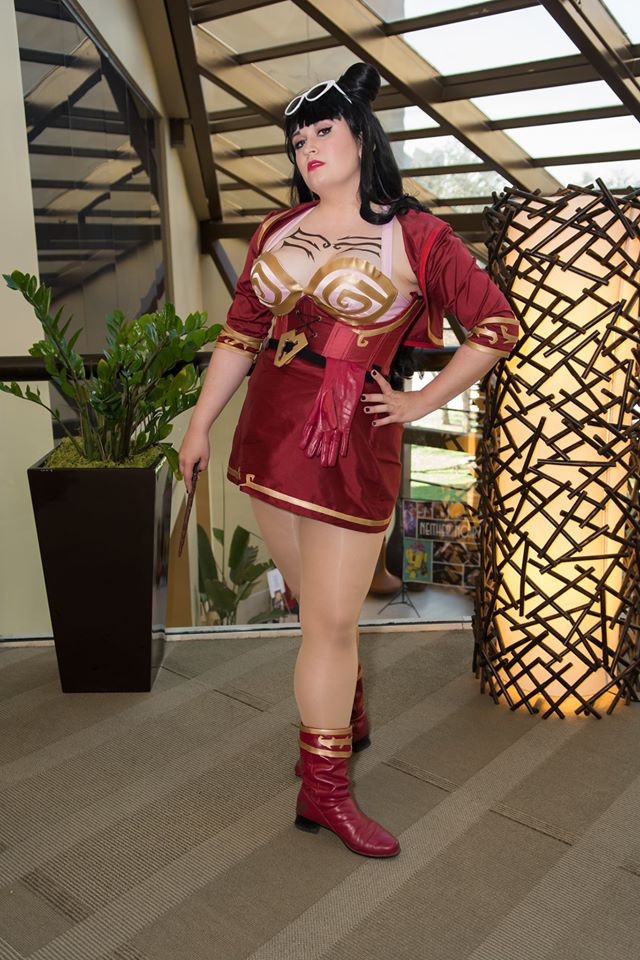
I’M NOT DEAD I SWEAR. Haha. I’m sorry for the accidental radio silence, folks. Real life got hectic, and my blog got pushed further and further in the back burner. That said, I’m back and ready to share information on some of my recent makes! So let’s start with my first fully completed costume of the 2016: Hannah from Rat Queens!
Completed: February 2016
Hours Spent: Somewhere between 40-50
Debuted: Dallas Comic Con Fan Days
Why this Costume: Callula Cosplay and I are big Rat Queens fans and have been thinking about doing these costumes for about a year. Our lucky stars lined up beautifully when we met Space Cadet Cosplay and quickly turned her into a fan! Our friend Vicky Bane has a gorgeous Dee costume, and she joins us at cons as her schedule allows!

How I Made it: HAHAHAHAHA, oh man, I made this WAY harder than it needed to be. I decided early on that I wanted more natural fabrics for this costume, and specifically fabrics that had really interesting texture. I ultimately settled on silk shantung with a really nubby hand. It’s so vibrant! It was also the most expensive part of my costume at $20/yd, so I made lots of mock-ups before I got to any of the good stuff!
For the bolero, I used the shrug pattern from Kwik-Sew 3400 and the hood piece from the Avacado hoodie. I slightly underestimated how much fabric I needed, so I wound up finishing the edges with red bias tape. For the cuffs, I cut off the sleeve portion just below the elbow, then used the same piece to draft the cuffs (proper side, lining, and facing). My first step with the cuffs was to interface the exterior facing piece, then sketch and top stitch gold vinyl trim. I held the vinyl pieces in place with Wundertape. Once the proper sides were finished, I used my lighter pink pieces as the lining and cotton for my facing. I can’t turn my cuffs down this way, but it makes for a clean finish and Hannah never wears her sleeve down anyway.
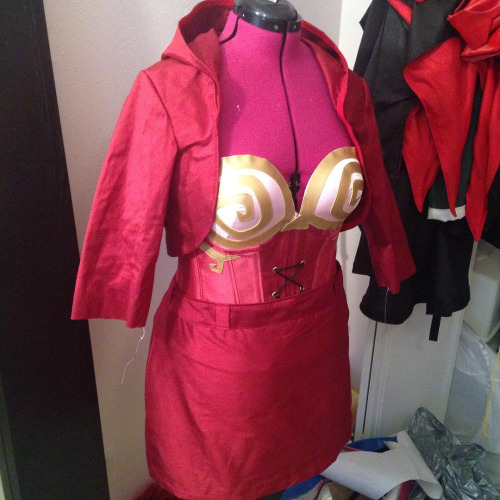
The corset is my trusty TV-110 pattern and by far the most difficult part of this costume. I made the full pattern as usual, using a peachy-pink silk shauntung as my shell fabric. The pieces are fused to duck cloth, which acts as my stability layer, and I used a pink cotton broadcloth as a floating liner. For this corset, I used twill tape for my boning channels since I used German plastic boning, which is thicker than standard spiral steel. I made continuous bias tape from my scrap fabric pieces.
Once my corset was fully assembled, I added the grommets on the front panels and cut out the front for the bust cups. This was definitely the trickiest part of this process. I decided early on that I didn’t want to do the cincher/bra approach that a lot of cosplayers use. BIG MISTAKE. I should have gone with a corset pattern with built in cups, because I had to re-do this piece 3 times. Ultimately, I settled on making a belly-dance style bra that sits under the corset so I get a bit of extra support for my girls. Check out this tutorial for an overview.

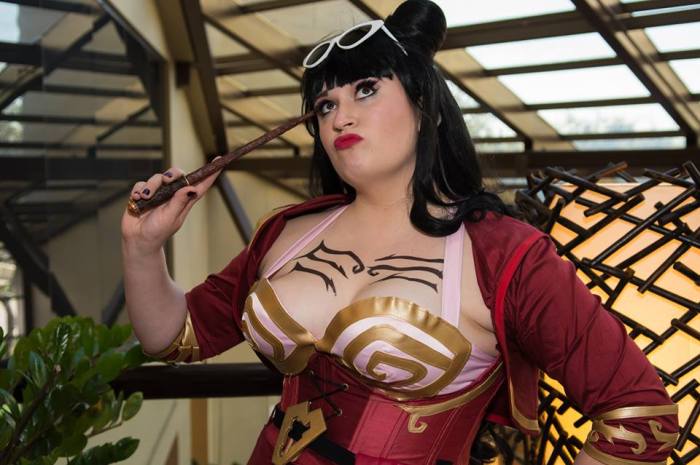
Creating the bra was a very time-intensive process. First, I patterned out the designs using scrap cotton and used the design to cut out my main fabric. From there, I serged my edges (the fabric was super fray-happy) and stitched a dart so that the fabric would curve over the bust. I then pinned the pieces to the bra cups, cut out my vinyl, and attached the vinyl to the bra cups with Wundertape. That provided plenty of stability when I top-stitched the vinyl to the cup pieces. After stitching the trim down, I hand-stitched the pink fabric to the cups, then hand-stitched the cups to the rest of the bra. Like I said, time-consuming, but it worked out well!
I drafted Hannah’s mini-skirt myself, but I used the Colette Iris shorts waistband pieces. This was the easiest piece, though I may take it in a bit more at the hips for future wears. The trim is pretty straight-forward and it closes with an invisible side zipper.
For the boots and gloves, I harvested pieces from old costumes. Specifically, my Bombshell Wonder Woman boots and my Captain Marvel gloves. I stripped the paint off of these pieces, and Callula gave them a fresh coat of Angelus paint to match my maroon fabric. Once she was done, I added the gold vinyl again. For the boots, I attached the vinyl with Barge cement, and I stitched the design on the gloves.
My faux belt is made from reject Lulu leather. For it, I just measured out my high hip measurement plus a few inches for overlap and doubled the width of my belt loops. From there, I folded over my pieces length wise and edge-stitched everything down. The ends close with sew-on Velcro.
I also made a hip pouch out of my belt material. I used this tutorial as a guide.
My wig was pretty darn fun to style. I picked up 2 pre-made buns from Arda and stuffed them with styrofoam cores in the shape I needed. Once I styled them how I liked them, I sewed the buns onto the wig using wefting thread. The buns stood out a little more than I liked, so I used long pieces from my base wig and wrapped them around the bottom of the buns to give them a more natural appearance. Since this ate up a bit more wefts than I would have liked, I hand stitched extra wefts from another old black wig for more volume. From there, I slapped on a blunt clip-on bang from Arda, and voila!
My original ears were a purchase from Yaya Han’s online store. They’re… okay. I’m not fond of the color, so if I do wear them again, I’m definitely going to paint them darker and add some shading.For my second ears, I got a pair from MadhouseFX Studio. These apply with Pros Aide or Liquid Latex. I used Callula’s pros aide, and they held on beautifully all day!
My wand was a borrowed piece from Callula! She made this in college for a theatre project. It was a great stand-in prop, but we definitely want to make Hannah’s staff from the more current issues soon!

For the tattoos, I sketched out designs similar to Hannah’s, filled them in with Sharpie, then scanned them into my computer. I then cleaned up the design and printed it off with Silhouette tattoo paper. This is such a great way to save time on make-up! It is fairly time consuming to cut the pieces out, but doing so in advance means that it only takes about 2-3 minutes to apply when getting ready. I have pretty sensitive skin, so I tested it out last week and was super giddy when I didn’t have any kind of allergic reaction. Would you guys be interested if I post my digital file on Google Drive?

Thoughts: This is by far one of the most fun costumes I’ve ever worn. Hannah’s crass, rude, and blunt, and it was so much fun to be utterly ridiculous and be in-character. It was also a blast to hang out with some of my closest friends who also share this fandom with me! I can’t wait to bring these costumes out again for future events.

P.S. If you like our flasks, you can get one for yourself here. They’re Tess Fowler approved 😉
Who’s your favorite Rat Queen?

All of you look fantastic and like you’re having the time of your lives!
Great wwork as always! I would have never thought that a rat queen could look so amazing… And I love the matching hip flasks! Great idea!
You all looked so fantastic! As always, I am so impressed with the dedication and skill you have in creating the costumes. So well done!