Photographer credit: Chez Photo
Oh man, talk about a big project! I decided to tackle this fuku for a couple of reasons. First, I’ve had several commission requests for Eternal fukus over the years, but I’ve never been comfortable making one for a commission without doing some trial and error first. Second, I wanted a big solo competitive piece, so I could use that as an excuse to go balls to the wall with this build and try out lots of new techniques. Third, I’ve had an interest in making several Sailor Moon accessories for my fuku commissions, which explains my rationale in how I approached a lot of these items, especially the smaller resin accessories.
So, let’s get this started!
Wig
The wig is both fairly straight forward but also time-consuming. I’m not going to write a tutorial here on creating a Sailor Moon wig, since several folks have done that already and much better than I could. I used a Chibi from Arda in Fairy blonde along with 2 long ponytail clips and short wefts.
After fixing the bag hair, I tweaked the bang line, stubbed the ponytails, created the odango and styled the bangs.
Special shout-out to Vickie Bane for giving me lots of helpful tips and keeping me sane when I wanted to chuck this in the trash.
Here are a few helpful tutorials:
- Anime Bangs
- Bag Hair
- Antiquity Dreams Sailor Moon tutorial
- How to style wigs with a garment steamer – Note: I ultimately wound up doing this for the bangs.
Wig Accessories


Here’s where we start getting to the fun stuff! As I mentioned above, I went into this build knowing that I wanted to create resin molds so to sell as part of my commissions. With that in mind, I started by creating odango shields in TinkerCAD. I made these as a two-part set: the base white layer and a top layer that I could cast with tinted resin. These are printed on PLA at my work (having easy access to a Makerspace is the best), then sanded and finished by me. Once the lines were SUUUUUUPER smooth, I took the pieces for the odango shields and created molds using Smooth-On products, specifically OOMOO 30.
Once the molds cured, I used Smooth-On 300 to cast the pieces. To create the white pieces, I “painted” white glittery powder from the Jacquard Pearl EX set into the mold, then poured in the resin, which cures in 10 minutes. For the red pieces, I “painted” Cast Magic Red Devil powder into the mold cavity and tinted the resin with a tiny bit of Red SO-Strong tint. I attached the pieces together with e6000.
The hair feathers were super fun! I traced the feathers from some ESM clipart I found online and created a vector of them in Inkscape. From there, I converted the files and cut them off on 2mm EVA foam using my Cricut Maker. I heat sealed the pieces prior, then glued them in a staggered pattern to match the pearl width. For the pearls, I found some flat back pieces on Amazon and glued them on the front and back of the feathers with hot glue. Once the full piece was dry, I glued the piece on a hair clip. This process is essentially the same for the other pearl/feather bits on her sleeves.
Again, here’s a helpful list of resources!
- TinkerCAD
- Finishing 3D printed pieces
- Smoothing the Surface of a 3D printed model using XTC
- Creating simple molds
- Using dyes and powders with resin
Base Fuku
Ahhh, the big part of this. Thankfully, I have a lot of experience making fukus, so this part wasn’t too daunting, but there are some big differences between making these and making classic fukus.
Note: I’m going to do a more comprehensive “how-to” tutorial over on Cosmic Coterie for this build (eventually), so my discussion below will mostly detail my thought process as well as trial and error.
One of my big hold-ups with making an Eternal fuku was the sleeves. They’re such an odd shape in how they look like bubbles, but are often drawn clear in the manga. I wanted something that had that bubble shape, but wasn’t *just* gathering. I turned to this tutorial by Angelic Threads as my prototype. This process requires A TON of tulle stuffing (I used nearly 4 yards of tulle in each sleeve), but it’s by and far my favorite way to make the sleeves. In fact, these turned out so well that I ditched my other protype ideas and stuck with this one! For the bottom of the sleeves, I used our glove roll approach at Cosmic Coterie, but just tweaked the pattern so it was 2 rolls instead of 3.
Once I ironed out the sleeve issue, it was time to tackle the belts! Proportions on the Eternal leotards are essentially the same as the classic fukus, so I took the base leotard pattern I normally used and built the pink belt into the leotard. The pink “belt” is my normal hip roll pieces cut on the bias and treated essentially in the same manner as the hip roll for a classic fuku. I will note that you must be EXTRA careful with the bias cut satin to prevent weird pulling. I cut a strip of interfacing and fused it to the top layer of the “belt” and also was extra mindful of my pressing. Additionally, you will likely need to taper the belt in at the center back to prevent puckering (if you care about that and I did).
The gold belt was very similar. I again took my hip roll pieces, cut them on the bias, and interfaced them. Once they were stitched together, I tacked the center front onto the leotard, then used snaps to hold the belt in place. Cutting the belt on the bias helps it curve around the body and lay flat!
The skirts are treated in the exact same manner as the skirts we use over at Cosmic Coterie. I did 3 circle skirts for each layer, basted them together, and treated them as one before pleating and attaching them to the base leotard. Then came the ETERNALLY (I crack myself up) long process of cutting and hemming 30 yards of fabric *dies inside*.
The collar was the most straight-forward part of the base fuku. I used the collar pattern Vickie Bane drafted up for us with my giant person alterations. From there, I made bias tape from my scrap gold fabric to create the stripes.
For Katsucon, I opted to create a standard butt bow since I didn’t want to travel with large wings. I’ll add those on when I get ready to compete!
Helpful tutorials:
Chest Brooch
This was another trial and error piece. I had a resin heart mold on hand that I love for my Super senshi. I experimented with some shimmery mixes for the resin casting before ultimately deciding on an opaque design with Cast Magic.
Like the hair feathers, I created a basic vector of the wing shape based on some artwork I found online and played with the sizing until I found the size I was most comfortable with and suited me proportionally. I then converted the files and cut the base shape out on my Cricut. As with the feathers, I heat sealed the pieces prior to moving on.
Once that was done, It was time to mount everything! The heart resin piece attaches onto the base wings with industrial strength Velcro and then attached the pearl feathers to the sides with e6000. For a little extra flair, I also glued a few fluffy feathers onto the base and also added some Swarovski crystals for extra sparkle.
To help keep all this nonsense on my chest, I attached 4 spin clips to the back that are held in place with Black Worbla.
Helpful Tutorials:
Gloves
Ugh, I hate how inconsistently the Eternals especially are drawn. Sometimes Moon is drawn with the points on her gloves, sometimes not. My preference is with them, for a very specific reason: hand access.
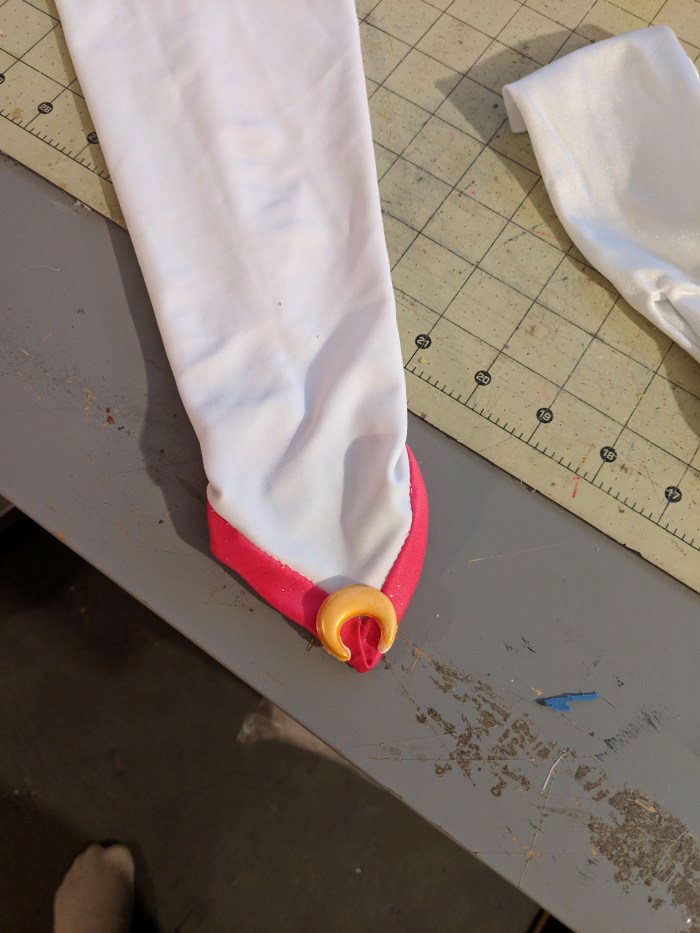
For these gloves, I bought a base pair of white wrist gloves from We Love Colors. I then made arm stockings from the same material as my leotard for the top (the glove rolls were made using our normal approach over at Cosmic Coterie and then adding on the feather clips). To create the point, I made some bias cut satin strips and used the same angle I use for hip rolls (app. 90 degrees). I then treated this as really fancy bias binding and stitched it around the edge of the arm stockings, gluing crescent moons I cast out of resin on the tip.
Once the bias binding was on, I hand sewed snaps on the stocking and the base glove, enabling me to easily remove my glove while in costume without having to take the whole piece off.
Boots
There’s not a whole lot to say on these that hasn’t been approached in other Eternals write-ups. I bought a pair of base white boots, but unfortunately they weren’t quite large enough for my calves. This was a pretty easy fix, thankfully. The boots had a center seam in the back, so I opened it up down to the bottom of my calf and sewed in a wide pieces of elastic.
After cutting the boots at a 45 degree angle, I stitched more pink bias cut satin around the tops and then glued on more crescent moons that I cast out of resin. Easy peasy!
Other Accessories


A few years ago, my Cosmic Coterie teammate Space Cadet Cosplay had plans on making ESM, so she bought a ton of generic molds for this project. When I mentioned I wanted to do this build, she was super sweet and gave me the molds. I used the mold she gave me to create all the stars you see on this build. The crescent moon molds are from MoldsbyMia.
For the heart/moon piece, I built a small model in TinkerCAD and printed and cast them as I described above. These two pieces are mounted on the choker, which is also a piece of bias cut satin stitched at an angle.
Thoughts on this build:
I nearly talked myself out of wearing this build so many times, but its one of my favorites to date! I love how everything came together and how many new skills I picked up, which is refreshing after making so many Sailor Moon costumes. I do plan to add on to this build for competition later in the summer and will absolutely document the process to share with all of you.
In the name of the Moon, make gorgeous things! ❤

