Photographer Credits: White Specs Photography
Completed: February 2019
Hours Spent: Between 15-20
Debuted: Katsucon 2019
Why This Costume: Me, Koho, and AdventTraitor are big Code Geass fans! This was the first group costume we decided on when we planned for Katsu, aided by our friend Jinxie Cosplay’s plans to make Suzaku! I had never worn Cornelia to a convention, so I took it as an opportunity to update pieces I was unhappy with.
How I Made it:
Truth be told, the updates on this costume were pretty quick. As I mentioned in my original Cornelia write-up, the main things I was unhappy with were her coat tails, the fit of the pants, and the boot covers.


For the coat tails, I took a cue from Koholint’s Mew Lettuce build. To hold the crazy tails in place, Koho split and curved pieces of Rigeline and built them into the seam for a gravity-devying shape. I carefully seam ripped enough space on my tailcoat to get access to the interlining. From there, I stuck in 6 extra pieces of rigeline and sewed the coat up again. Once that was in place, I pressed the ever loving crap out of the boning and weighted it with heavy books until it cooled and held its shape. I still need my friends to check me for shoots, but the tails of the coat hold their shape much better now.
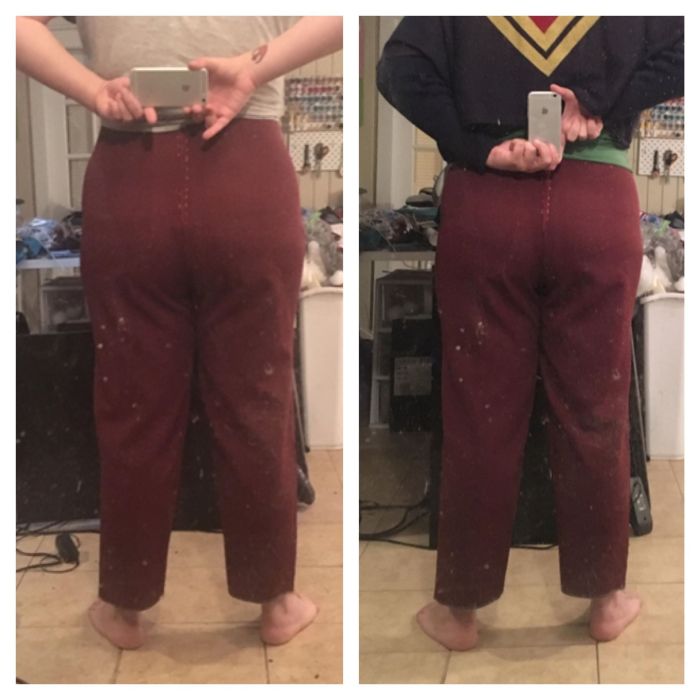
To fix the pants, the first thing I needed to do was explore fit issues. I primarily had an issue with full thigh, so I carefully seam-ripped the pants and and adjusted them until I could remove the majority of the unsightly wrinkles. Unfortunately, they’re still not perfect, but Mood is sold out of this fabric, so I did the best I could with what was available to me. Additionally, I moved the zipper to the center back, reinforced it, and traded the pants waistband for a self-drafted facing to drop the overall height of the pants. Finally, I added bands to the bottom of the legs from scrap fabric so that I could tuck them into my boots easier.
The boot covers required a complete do-over. I decided this time around to build the covers over a pair of boots so that they wouldn’t flop over like my last pair. My Pluto boots are the perfect base shape, so I patterned these out by covering my foot in saran wrap and duct tape. After making a quick mock-up, I stitched these together with some white vinyl. The base of the shoe is glued on with contact cement, and the top is stitched over the boot itself. I changed the color of the sole with 4 layers of white Plastidip, which was much faster (and durable) than the approach I used for Mami.

The final piece I tweaked for this build was the wig. I was very pleased with the wig’s color, but I wanted more volume around the hair line. Unfortunately, I didn’t allow myself enough time to add wefts to this wig, but I did re-style it using gravity, a lot of teasing, and some helpful drag techniques. Sadly, it didn’t work out quite the way I’d hoped (these curlers were the worst and did not want to let go of my wig fibers), but there’s always next time!
Thoughts on This Build:
All in all, I’m much happier with this build. There are still some things I want to tweak, along with extra pieces I want to make (I’m talking about you, BS cape and gun blade). But it was so much fun running around with friends in Code Geass costumes! Honestly, this was probably the most fun I had in a costume at Katsu. We spent a large portion of the day replicating ridiculous memes and it was glorious. Here are a few of my favorites.


