
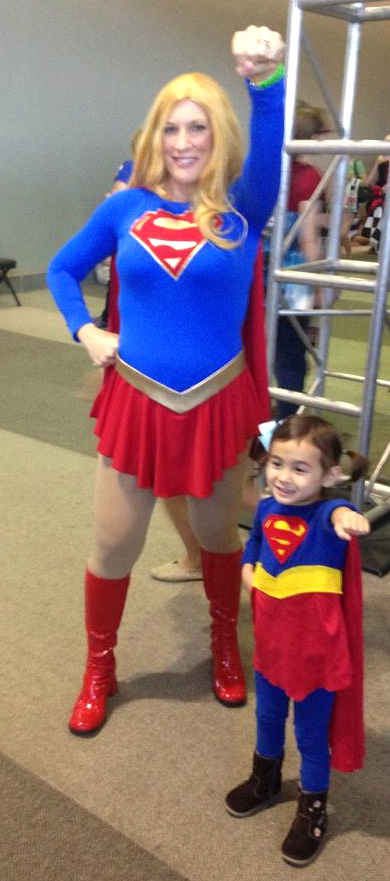
Completed: May 2014
Hours Spent: 12-15~
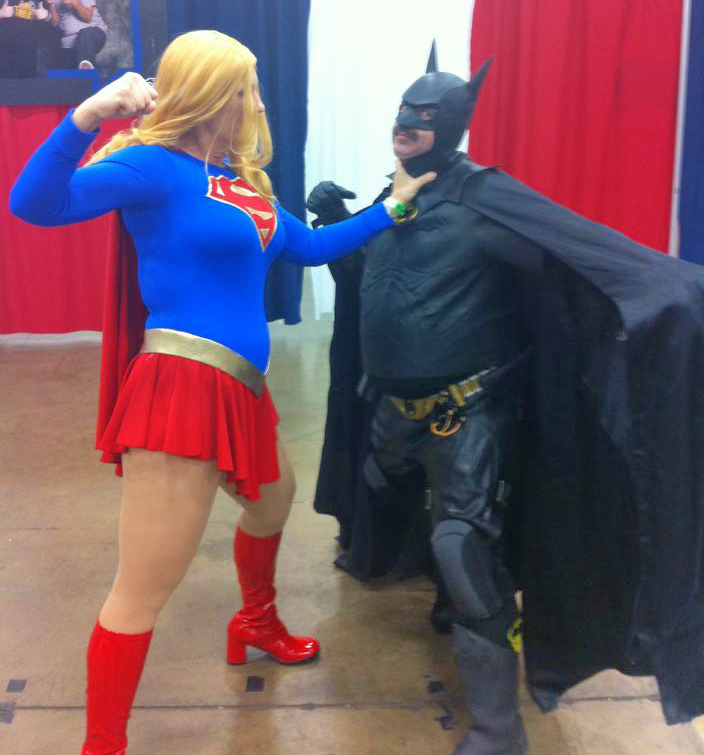
Debuted: Dallas Comic Con 2014
Why This Costume: This is the first full costume I’ve made for another person. My mom is a pretty rad lady, and she really loves Supergirl. She expressed interest in attending a con with me a while back and wanted to dress up. As a thank you for helping me with some stuff/generally being awesome, I decided to help turn her into one of her favorite characters. We ultimately decided on a a “classic” Supergirl that’s loosely based on the 1984 Helen Slater film. Being an 80’s teen, my mom really appreciated the throwback.

How I made it: Basic construction of this costume is pretty simple. I used the Green Pepper Crystal Lake pattern (a.k.a., the Sailor Senshi pattern) with the long sleeves and the attached circle skirt. I snagged the blue and red spandex from my local shop, Spandex Wherehouse. I absolutely love this place. Low prices for high quality fabrics. I had the gold fabric on hand, so I swapped out the yellow for a more eye-grabbing pop.
I raised the neckline and the back a bit to make it more accurate. The pattern is designed so that the wearer slides in through the top, so I had to modify the crotch so that it closes with hooks and eyes, letting my mom slide everything on overhead. Anything for easier bathroom breaks in costume!
I realized as I was sewing on the sleeves that I didn’t have quite enough fabric for the sleeve length. Derp. I had to size up a tiny amount, so I should have grabbed an extra bit of fabric. Live and learn. Anyway, I had some scraps left over, so I used the cuffs from my Renfrew and used Tasia’s method to finish the sleeves.
The most time consuming part of this costume is the emblem. For this, I followed the tutorial from the Dangerous Ladies. Mine isn’t perfect by any means, but I am so grateful for this tutorial. It’s a lifesaver. The emblem took me about 4 hours start to finish. I nixed the emblem on the cape due to lack of time, but I’ll probably work on it before my mom wears this again.

The belt was a pretty fun accessory to make. I made it out of craft foam and glued spandex using contact cement (tutorial on the process here). The belt attaches to the leo with velcro.
For the cape, I measured out the neck from the leotard and basically drafted a partial circle skirt for a more “in-flight” look. The cape and skirt were finished with a rolled hem on my serger. The Dangerous Ladies recommend making capes easily detachable for safety and storage, so I used sticky back velcro on the inside of the collar.
The wig is the same wig as my Ms. Marvel costume (which I’ll post later this week). It’s an Arda Buttercup that I picked up from Nicole Marie Jean a few months ago. I just lightly curled the ends for more body. I also made spandex boot covers, but we were having trouble making them stay, so the boots she’s wearing are from Amazon. I’ll have to play my boot cover pattern a bit more before she wears this again.
Thoughts on this costume: I’m very pleased with this costume. Aside from the detail work, it was a very quick and simple project to put together, but it still gave me the chance to try out some new skills. Plus, I really enjoyed making something for my mom! She absolutely rocks that costume. I’m tempted to make a Power Girl to match!

You can see more pictures of this costume and my other costumes from the weekend on my Facebook page!

You both look amazing – your mum is super cool!
Thank you! She is pretty rad 🙂
Love it! You are so talented – I think I saw you at Dallas Comic Con but from far away lol. It was so crowded in there!
Thanks! Yeah, it was pretty hectic. I’m glad they moved to a larger location, but I feel like I missed so much because everything was spread out.
This costume came out amazing! It was so beautiful in person. Your mom is super cool too 😀
Thanks, friend! 😀
Amazing! Any tips on working with spandex? I haven’t tried it yet myself.
Thanks! Hmm, I have a lot of tips to share, so I may make a whole separate blog post about this at some point. Here are a few quickie cliff notes:
1. Be mindful of 2-way vs. 4-way stretch patterns. You can use a 4-way stretch fabric on 2-stretch patterns, but the reverse is not true without a lot of heartache and profanities.
2. Sergers make life easier with spandex costumes, but it’s not impossible to use a regular sewing machine. Just get to know your stretch stitches and test everything out.
3. Stabilizer is your friend, especially for superhero logo appliques. This tutorial is amazing: http://crashcult.blogspot.com/2011/01/costuming-stretch-applique-tutorial.html
4. Superhero costumes are pretty much impossible to find patterns for, so find a solid base (I like Kwik Sew), make a mock-up out of cheap spandex, and draw your lines in to create a new pattern. I’ll demo this when I get around to making She-Hulk.
5. When you finish, your costume will look smaller than you think it should, especially if you wear a lot of wovens. It’s okay! It just takes a bit of time to get used to.
6. DO NOT use the dancewear spandex from Jo-Ann’s or Hancock. It’s shitty, too thin, and costs way too much. $20/yd for your see-through spandex? Not happening. Check your area to see if you have a local fabric or spandex outlet. If not, check SpandexWorld.com or SpandexHouse.com. Their shipping is expensive, so try to group orders together when you can.
7. Have fun with it!
Hope that helps 🙂
Thanks for sharing the process of making Supergirl! Your mom looked like she had a great time while wearing it (if only I could get my mom to do that!)
Happy to share! Hope you find it helpful. Haha, she had a blast!
Your mom is AMAZING! As is the costume!
Thank you! 🙂
You NEED to make a Power Girl costume to cosplay with your mom! I squeed when I read that.
Lol, yes! PG is on my never-ending cosplay list, so maybe next time!