Photographer Credits:
Completed: May 2017
Hours Spent: HAHAHAHAHAHAHAHAHAHAHA. I kept track up until April, when A-Kon told us our group was too big to compete. After that I stopped caring.
Debuted: A-Kon 2017
Why This Costume: When the Cosmic Coterie crew decided to make Madoka as our major group build this year, I jumped at the chance to cosplay Mami. She’s by and far my favorite character and design, and had a couple of crazy design elements I wanted to jump at to improve my prop making and wig making skills.
Purchased Pieces:
- Contacts: Etia Coeur in Caramel Gold
- Base gloves: We Love Colors solid wrist gloves in white (dyed and altered)
- Soul gem base kit: The Dangerous Ladies
- Wig: Arda Chibi and long clip in extensions in Fairy Blonde
Patterns Used:
Super Helpful Tutorials:
How I Made it:

To create the hat, I dug up some books on millinery. After looking at multiple reference sources (including my Mami figures. Knew they’d pay off eventually!), I realized that Mami’s hat isn’t a standard pillbox hat; it tapers in rather dramatically. I used the information found in Basic Millinery for the Stage to create a buckram base. The shell fabric is a chocolate velveteen from OnlineFabricStore.net with a matching lining. It stays in place with sewn in wig combs.

My wig was an intense experience, which I detailed here. It took several tries to get right, but it’s one of the pieces I’m proudest of with this build! Sparkle Pipsi’s drill curl tutorial was an invaluable resource.

Initially I wanted to make my own mold for Mami’s soul gem, but when I stumbled across the kits provided by TheDangerousLadies (I got the fabric for my stockings from them too!), I decided to save myself the trouble. The kits come unpainted, so I lightly sanded the base gem, primed and painted it, and then used jewelry wire I had on hand to create a flower backing. The wire is held in place with scrap Worbla, and I used e6000 to glue hair pins onto the back of the Worbla.

My blouse was one of the easier parts of this build. Yaya’s peacoat pattern in my size required minimal alterations. I went with view A and used the puffy sleeves (shortened to appropriate Mami proportions). I decided to leave the peplum shape on this top since it was tucked into my skirt anyway, which meant that it acted as a slip. I created strips out of gold satin and attached those to the center front of the bodice before adding in my invisible zipper. For the neck piece, made the collar according to pattern instructions, then cut a small strip of gold on the bias to create the trim on her collar. The center front buttons on the blouse were a lucky find from Jo-Ann’s. They have adorable flowers embossed on them! The gold buttons on the sleeve cuffs were harvested from my old Captain Marvel, and the trim on the arms is the same velveteen I used for my hat. It’s a bias cut strip that I carefully pinned around the arm hole after attaching the sleeve. It’s edgestitched down. The sleeves are underlined with tulle to help them retain their puffy shape.

The arm warmers are made from the same peachskin I used for the blouse. I drafted a bell-shape that started at my bicep and ended at the wrist. I left enough room at the bicep to create an elastic casing and gathered the base for puffy sleeves. As with my blouse sleeves, the arm warmers are underlined with tulle for maximum puff.

My gloves were far more of a hassle than I anticipated. I picked up a base brown pair from We Love Colors, but they weren’t quite brown enough. I attempted to dye them, but the dye didn’t take AT ALL and actually made the gloves lighter. I picked up a white pair instead and dyed them to a deep brown (2 parts brown dye, 1 part black) and that did the trick. Once the gloves were dyed, I cut off the fingers at the knuckles and hand stitched gold neoprene bands on the ends.

The corset was my showpiece, and I spared no expense. Since Mami’s design is relatively simple, I went for an embossed floral vinyl from Mood and stained it to a deep chocolate color using Eco-Flo. The patterning is a lot to explain in one post (don’t worry, a more detailed write-up is coming soon), but essentially I made a closure to cover the busk using information from Lucy’s Corsetry and made a hidden lacing panel in the back that closes with a separating zipper. I made 2 corsets total: one using a floating strength layer and another using the welt seam approach. The welt seam approach was my final corset, since I made the first one just a hair too big. It makes me so sad the first one didn’t work out, because I used adorable lining fabric designed by Sparkle Pipsi! Maybe one day I’ll feel up to adding a lining to my second corset and buy more fabric. Both corsets use cotton coutil as the strength layer and use a combination of spiral and flat steel boning.

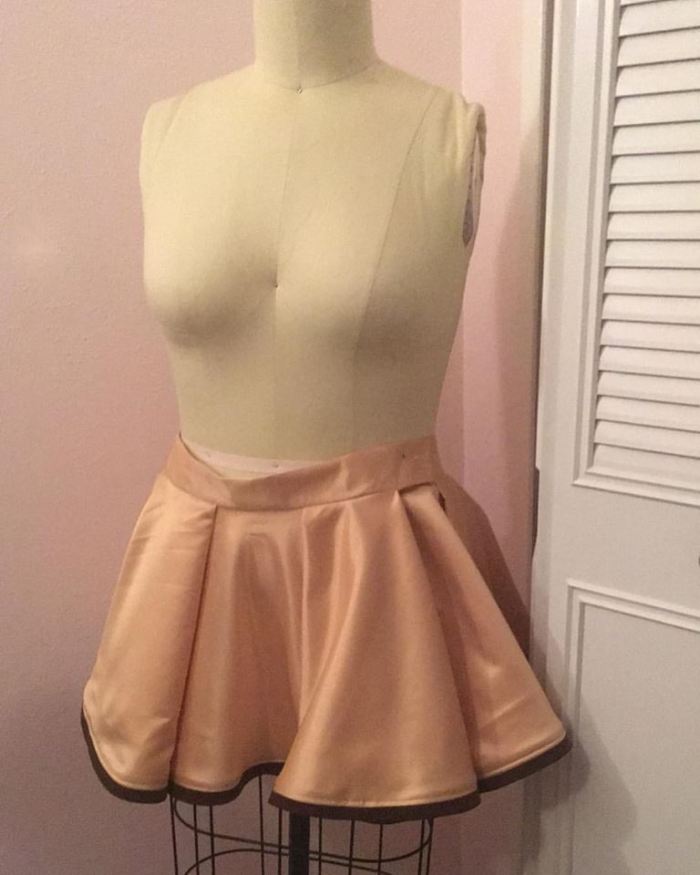
Mami’s skirt has very noticeable box pleats, so I combined two full circle skirts and marked off 4″ box pleats with full returns and then skipped 4″ sections between pleats. The hem has 1″ horsehair braid, and the brown strip is chocolate peachskin cut on the bias. It took a little math to figure out, but essentially what I did was completely encase the horsehair braid so it’s not visible from the top or bottom of the skirt. Super clean for the win!
For Mami’s thigh-highs, I used Yaya Han’s stockings/bootcovers pattern and some lovely ribbed knit from The Dangerous Ladies. The tops and bottoms have elastic in them for a super secure fit. I still had issues with my stockings falling down at A-Kon, so I stitched them to my dance tights for AX.
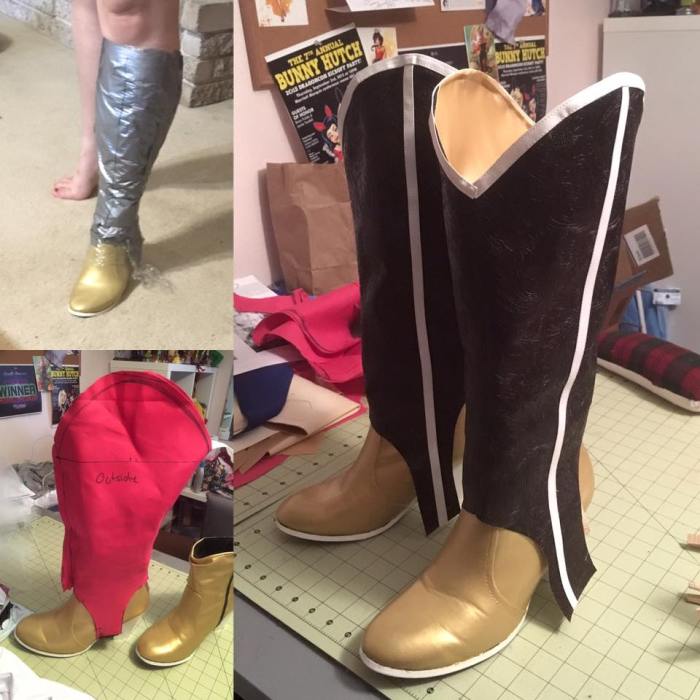
I was pretty darn pleased with how my boots came out. I had a pair of chunky heels sitting in my closet, so painted them gold with Angelus paints, painted the heel and sole white with acrylic paint and gesso, and then made boot toppers out of the same fabric as my corset. To create the boot toppers, I used the duct tape/saran wrap patterning method, then made a mock-up of my boots to tweak fit issues. Once that was complete, I created the toppers and lined them out of gold leftover from my skirt. I glued the boot toppers to the base shoes using Shoe-Goo, but then went back in and hand sewed the base for aesthetic appeal. The white strips at the top are vinyl bias tape I found on Etsy, and the gold tabs are leftover material from Hannah.
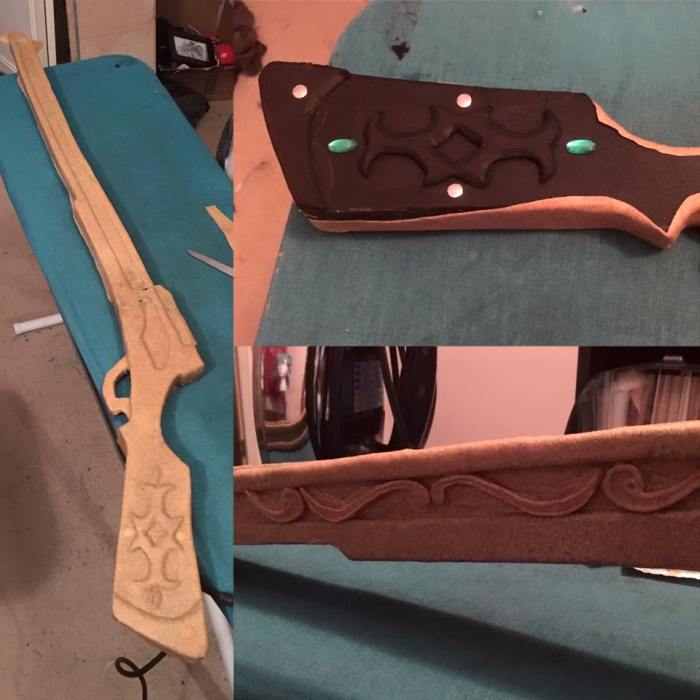
Another reason I chose Mami for this build was the chance to work on prop making. I love Mami’s rifles and wanted to flex my prop muscles here, so I did a lot of research on creating weapons out of foam. Kamui’s eBooks were an invaluable resource, as was the pattern vectorized by The Dangerous Ladies. This is another lengthy upcoming post, so the short version is that I made it from an EVA foam base, covered it with Worbla, used PVC pipe for the barrel, then primed it. I was running short on time at this point, so Storietellers took over painting for me.

The bow was self drafted and mostly made out of looped tubes. It snaps onto my choker!
Final Thoughts:
All in all, I’m very pleased with this build. There are a few things I might do differently now that it’s complete and I know more, but that’s true of any build. I’m a bit sad I didn’t get a chance to compete with it, since I built it with that in mind, but there’s always next time.
Who’s your favorite character from Madoka Magica?

Reblogged this on Cosmic Coterie.
AMAZING!!!! I love the wig work as well!!!!