Welcome to the final post in the spandex 101 series! If you need a refresher, see post 1 on basics, post 2 on fabric prep, and post 3 on construction. Today, I’m going to share a few of my favorite tutorials and tips to turn a basic leotard or bodysuit into attire for a superhero.
Creating and Attaching Appliques
It’s hard to get around a superhero suit without some type of applique. Pretty much EVERY superhero has some type of logo, with some more complex than others.
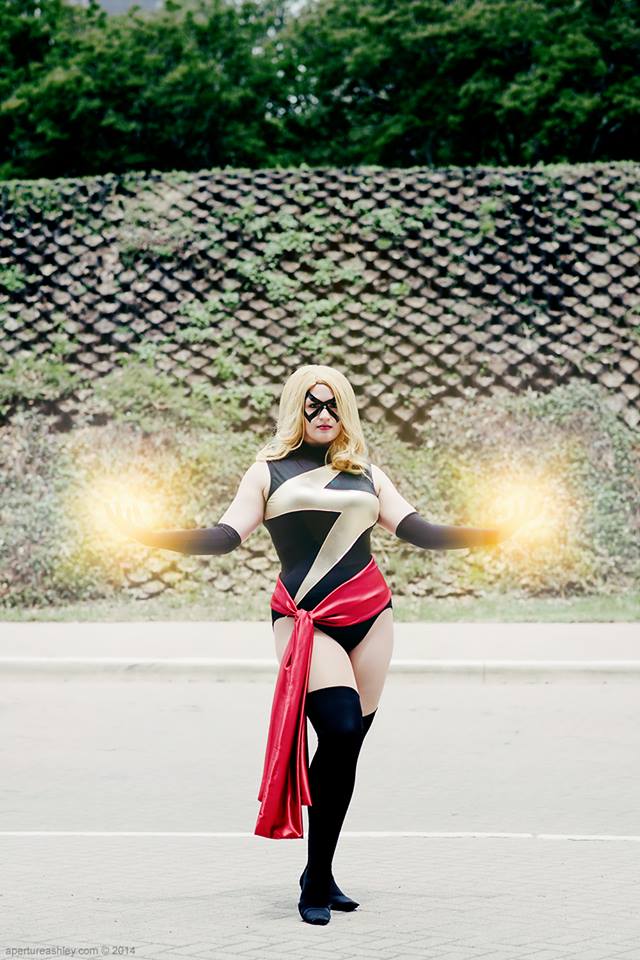
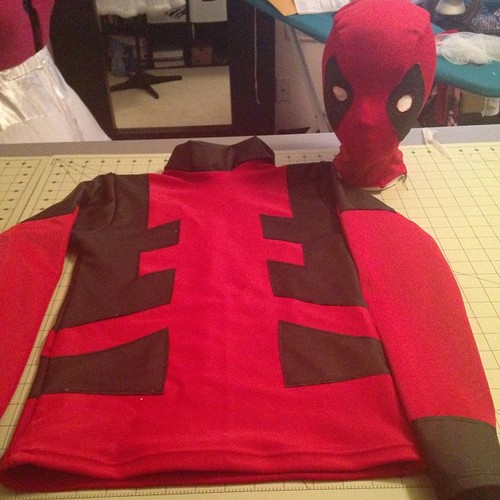
There are two basic ways to create a stretchy applique: slap it on the right side and top stitch or create a reverse applique by cutting out your design from your main fabric. Personally, I like the top stitch approach. I’ve used it for Deadpool, Ms. Marvel, and Supergirl. It’s very easy to do with a few basic tools and adds a bit of extra depth to your costume.
The tutorial linked above covers just about every question you could have relating to appliques, but I will share a few tips that make life easier for me:
- You CAN use irons on spandex! I see so many people freak out over this. Yes, excessive heat is bad for spandex, as it will lose its elasticity. Just set your iron to a low, synthetic setting and use a press cloth.
- DO NOT, I repeat, DO NOT use pins for this. You will get bubbles (most likely). While working on Deadpool, I ran out of fusible stabilizer and just pinned stabilizer in place. So annoying. Layer your fabric pieces between your stabilizer like a stabilizer/fabric sandwich and you’ll be good.
- Take mechafaux’s advise and trace out your stitch line. It’s very difficult to see your fabric through the stabilizer, so taking just a few extra minutes to sketch out your lines is suuuper helpful.
- If your needle is giving you trouble, extend the length of your stitch.

Creating a more complex logo like Supergirl is essentially the same, but requires a few extra steps. You’ll want to create your logo prior to attaching it to your leotard. I used this tutorial from The Dangerous Ladies. Creating your logo is pretty similar to attaching an applique, but you’ll want to use double-sided fusible web to attach the various fabrics together. I’ve used a couple of different brands and had success with pretty much all of them. Test a scrap of fabric before you work on the final thing!
Also, a logo like this loses its stretchiness due to the fusible web. Make sure to attach it to an area that won’t require too much stretch.
Creating Inlays
Another approach to creating logos or larger designs is to design and create inlays. I mentioned in this post how I came up to my designs for top stitching, and it’s the same for inlays: create a mock-up and draw in your design. Once you create your pattern pieces, you’ll need to add a seam allowance (typically 3/8″). My one main tip for inlays is to baste your stitches before serging or committing to your final stitch.

Dyeing Spandex
Remember when I worked on Deadpool and mentioned that my fabric was waaaaayyyy too bright? Well, I fixed that nonsense by dyeing it! I know, seems crazy, right? Well, my friend Meredith shared a tutorial that blew my mind. BONUS: it’s super simple.
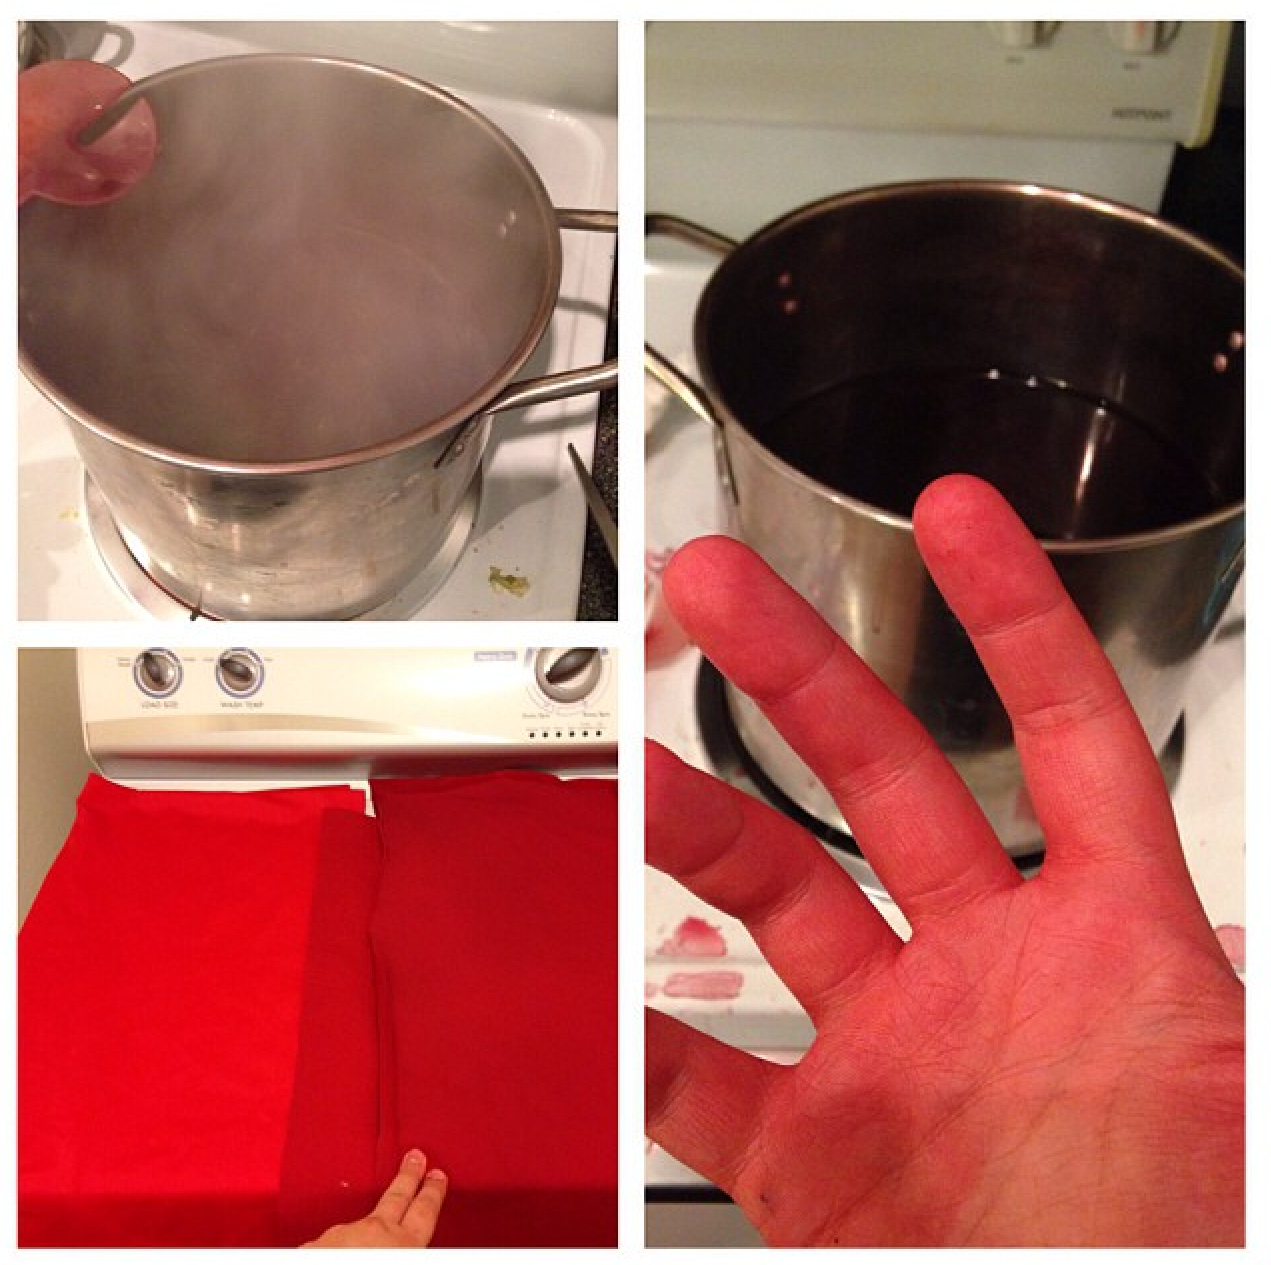
Pretreat your fabric, then create a dye bath with iDye Poly and add a small amount (I used 1/4 cup) of vinegar to create an acid bath. This will allow the fabric to accept the dye. Swirl it around in your boiling pot for a few minutes (I let mine boil for about 2 minutes), let it cool, then run it through the cold wash. Boom, awesome color.
Just make sure to use a pot large enough to let your fabric swirl freely. Otherwise you’ll get funky splotches.
Holding up Bootcovers
One of my biggest annoyances with most costumes is ridiculous boots, especially thigh highs. Finding boots that cover my calves is hard. Finding some that fit, kind of match my costume, and are less than $100 is like finding a rainbow-farting unicorn. Instead, I make bootcovers out of spandex. There are lots of awesome bootcover tutorials on the web. What I want to mention instead is how to hold those bad boys up. Many thanks to DJ Spider for her awesome tutorial!

To do this:
- Put on your tights and boot covers, adjusting them to the height you want.
- Carefully pin your tights and boot covers together, pointing the needle down. More pins helps!
- Very gently pull your combined tights/covers off.
- Using a zig zag stitch, carefully stretch your tights and boots to the same tension and sew them together.
- Grab your excess tight below your stitching and snip it off so it doesn’t twist on you.
- Go kick some superhero ass.
Create Super Cheap Armor and Accessories

Need a flexible piece of armor? Cover craft foam with spandex! This is one of the coolest techniques I’ve learned this year, and I used it on Supergirl. RuffleButt Cosplay has more details here, but here are my CliffNotes:
- Pattern out the piece you need and cut out your craft foam. Use your pattern to cut out your spandex, making sure to add a seam allowance.
- Coat your fabric and foam with contact cement. Let them dry for a few moments, then attach the two.
- Once each piece has dried for a few minutes, grab your glue gun. Snip your fabric at corners and over curves and glue the fabric to the back side of the craft foam.
- Let it dry and admire your handiwork. I attached the Supergirl belt with Velcro.
That wraps up this series on spandex! I hope you found it useful. If I could leave you with one final tip, it’s this: have fun and don’t be afraid to experiment. Your first couple of projects might not be perfect, but you’ll get there! Just like anything else, you’ll get better with practice.
What’s one spandex tip you would share?

I hope you do more posts series like this one! I learned a lot, even though I don’t sew! All the information you provided during these posts are great!
Thanks! Glad you found it informative. If you’ve ever got a request or suggestion, feel free to let me know!
LOVE this series! It’s been so, so, so informing!
Thanks! It’s been fun to write and gather all of my favorite tools and tutorials in one place 🙂
this was fun to read, even though I don’t know how to sew! I just keep admiring your work, you are SO talented!
Jessica
the.pyreflies.org
Aw, thanks so much! 🙂
So not a cos-play person. Infact middle age suburban mom and I ran across your website after googling difference between moleskin and other spandex types. I’m just getting into seeing with spandex because my daughter is a competitive dancer. And WOW your blog posts on spandex have been AWESOME FOR MY LEARNING CURVE. Thanks.
Thanks, Charlene! And how fun. I was a competitive dancer when I was younger. Happy you found it helpful!
Thank you so much! I’ll send this to a friend of mine
Hello! Can you explain how I could modify this pattern to fit a 6ft man with a small frame? Any help would be appreciated 🙂
Hello! So there’s a couple of things you’ll want to consider with this pattern. First off, you’ll want to use the cut lines to heighten it. It’s designed for women at 5’6″, so you’ll need to add 6″ total across the cut lines. You’ll also need to straighten the center front and center back seams. Finally, you’ll need to pay attention to length in the groin area. I can’t speak to experience with that one, but you might check out http://www.stretchy.org/ for tips. Hope that helps!
I am trying to adhere small white foam stars to a blue spandex skirt (for a Wonder Woman costume) – would you recommend gluing it down (if yes, what kind of glue) or still using contact cement?
Hi there! I wouldn’t use contact cement to be honest. It doesn’t work well with fabric. e6000 would probably be a better alternative, but again, check the instructions on the glue before you totally commit! If your skirt stretches AT ALL wherever it attaches, you’ll need to stuff it to accommodate the stretch.